
Since apps need to meet certain standards to be published on the Google Play Store, I've summarized all the steps you need to follow to successfully publish your next app. The main focus is setting up Unity in such a way that, after building your APK and uploading it on the Google Play Console, you won't receive any compliance errors.
However, I won't talk about the necessary steps inside of the Google Play Console, but you can have a look at Google's official documentation where they're covering that topic in full length.
Want to watch the video instead?
Prerequisite
Make sure to have the following software downloaded and installed:
- Unity hub and Unity 2019.4.15f1 and above. (In Add Modules, make sure to have Android build support installed).
- Android Studio 4.1.3
Guide for downloading and assigning Dev Kits
The following development kits are required to successfully build the app:
- Download NDK and Gradle.
- Once downloaded, extract the ZIP files and place them in your desired location.
- Using Android Studio, download the SDK for version 8.0 and above.
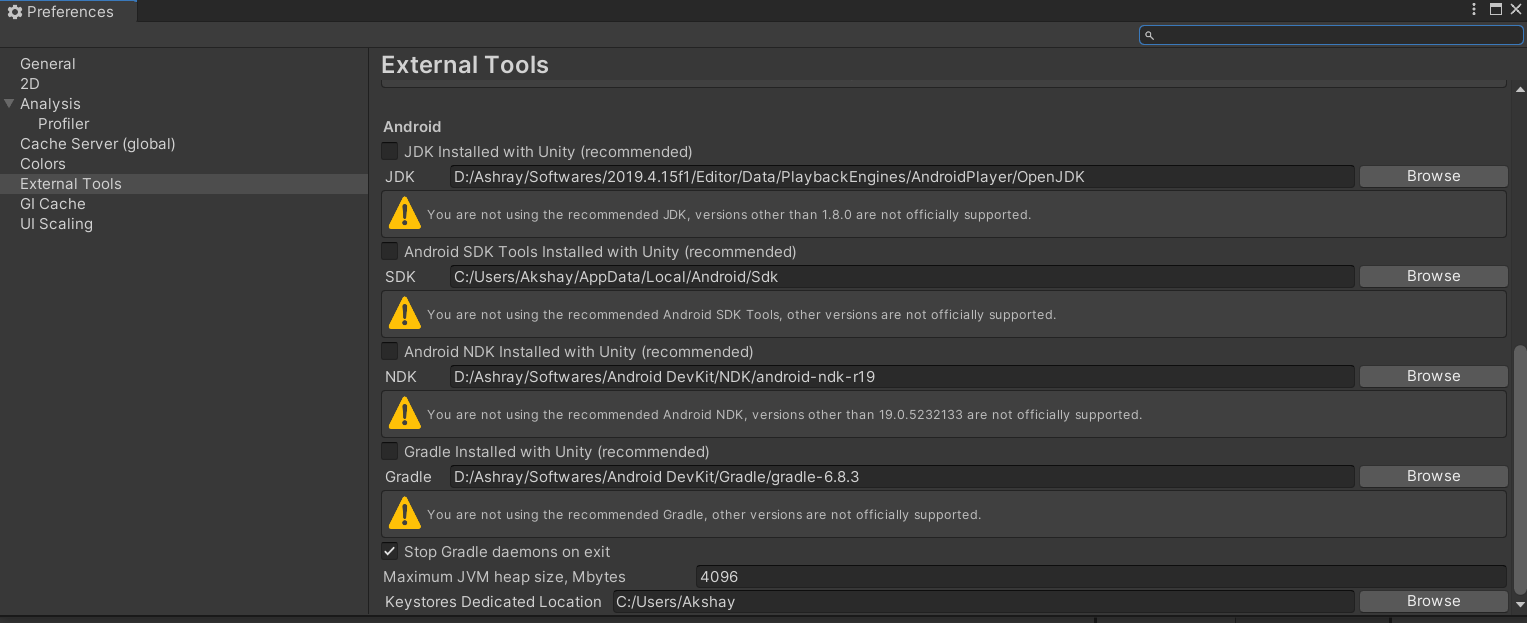
- In Unity, go to Edit → Preferences → External Tools and enter the path of the respective Dev Kits.
- Generally, for the JDK the path is going to be D:/"SOME_LOCATION"/2019.4.15f1/Editor/ Data/PlaybackEngines/AndroidPlayer/OpenJDK
- For NDK and Gradle, the path is the location where you downloaded and extracted the files.
- For the SDK, the location will be mentioned in Android Studio.
Helpful to know 💡
NDK (Native Development Kit) is a set of tools that allows you to use C and C++ code with Android, and provides platform libraries you can use to manage native activities and access physical device components, such as sensors and touch input.
SDK (Software Development Kit) is a collection of software development tools in one installable package. They facilitate the creation of applications by having a compiler, debugger, and perhaps a software framework.
JDK (Java Development Kit) is a software development environment that offers a collection of tools and libraries necessary for developing Java applications.
Gradle is a build automation tool for multi-language software development. It controls the development process from the tasks of compilation and packaging to testing, deployment, and publishing.
Setting up Unity's player settings and downloading AR packages
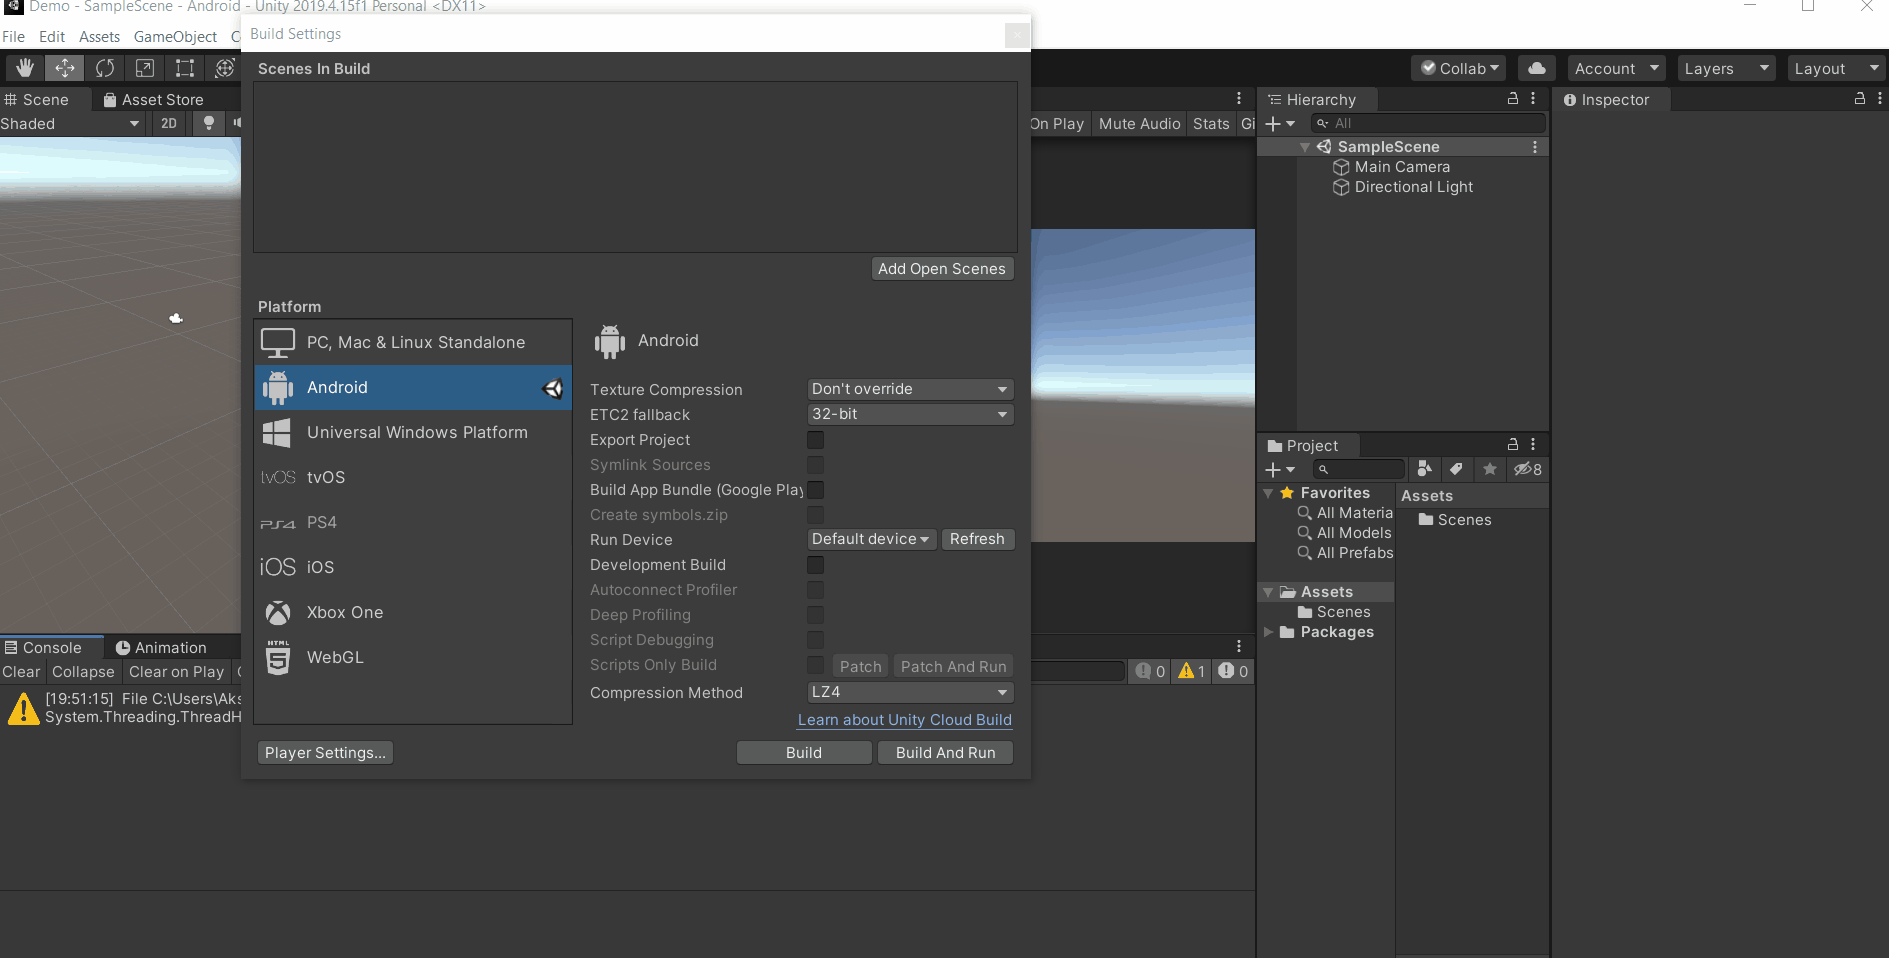
- Click on File → Build Settings, this will open a Build settings window. Select the option called Android and then click on Switch Platform. Now, wait for it to load.
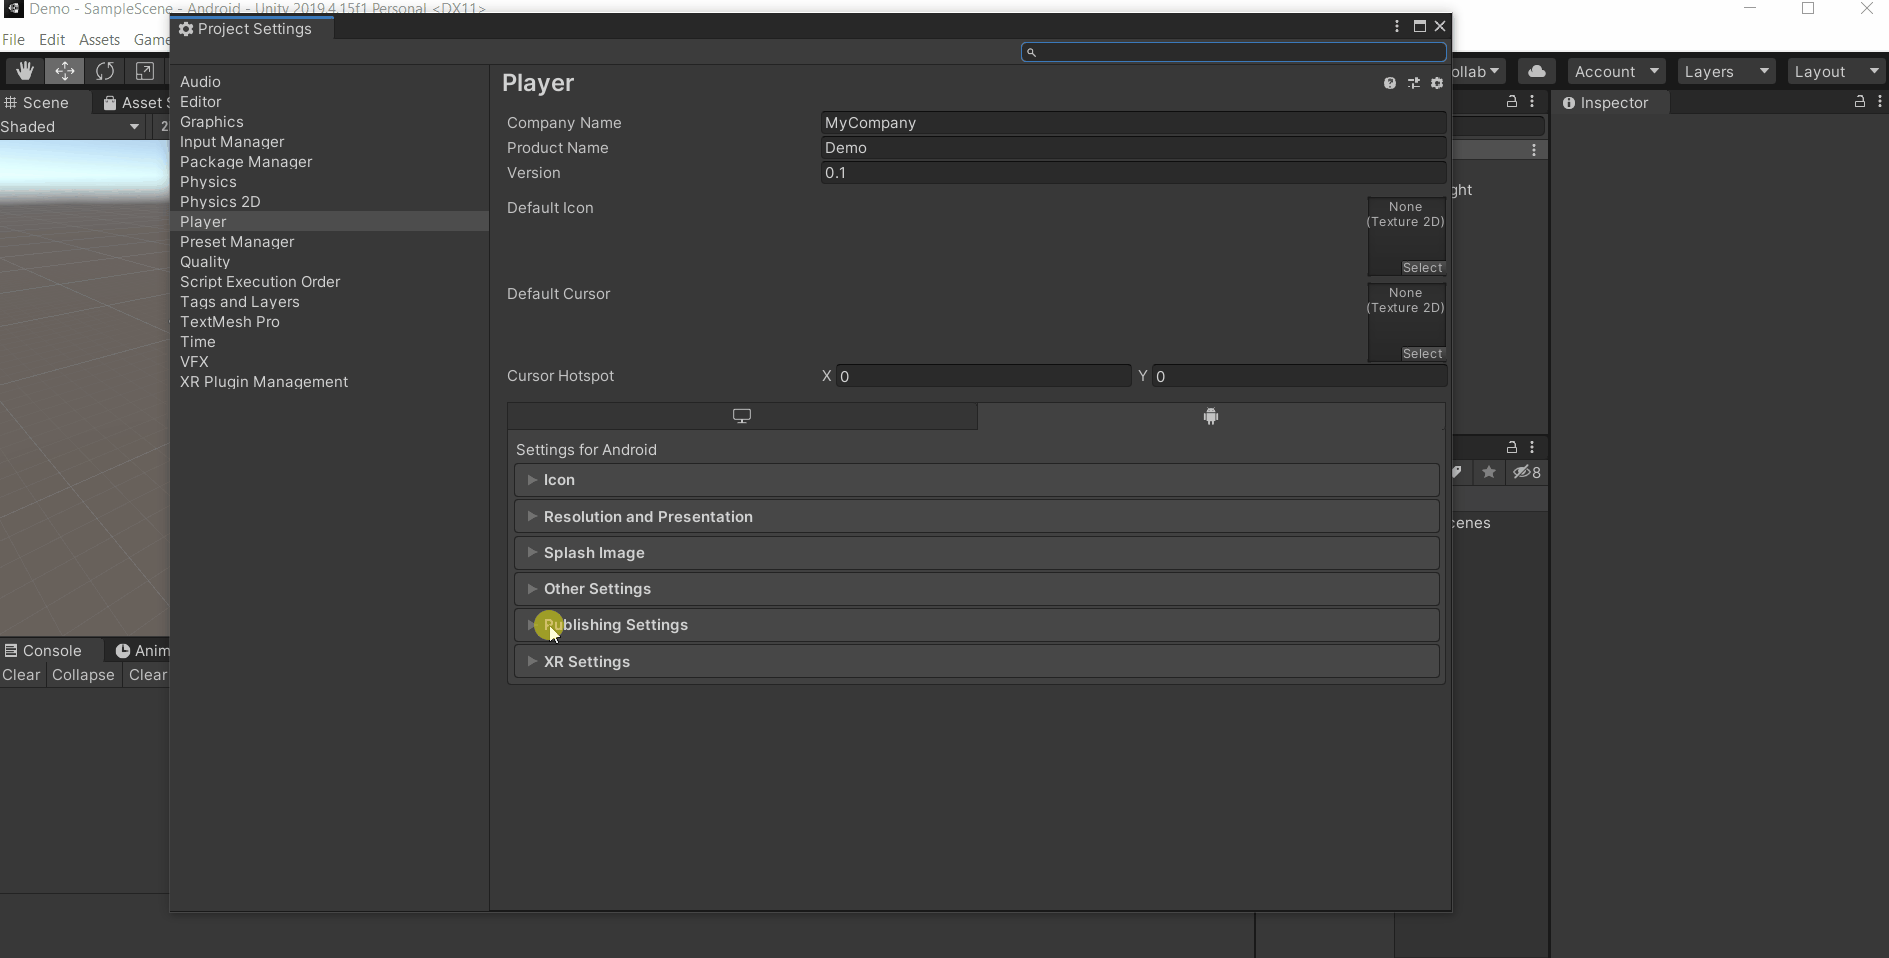
Select Player Settings and make the following changes:
- Change the default company name to your company name.
- Select Other Settings and
- Remove Vulcan from Graphics API,
- Uncheck Multithreaded Rendering,
- Change Minimum API level to Android 8.0 and above,
- Change Scripting Backend to IL2CPP (Why? To view ARM64 architecture.)
- Change API Compatibility Level to .NET 4.x and
- Check the box for ARM64 under Target Architecture.
Then, select Publishing Settings.
- Click on Keystore Manager, select Keystore... and click on Create a new key.
- Select the location where you want to store the key and hit enter.
- Enter the password for the keystore.
- Enter the name of your key and password for the key and click on Add key.
- Confirm to set the created key to the project by clicking on Yes.
⚠️ The next step is only required if you are using the Unity version 2019.x, it's not required for the Unity version 2020. - Check the box for Custom Main Gradle Template and Custom Launcher Gradle Template.
- Click on Windows → Package manager and install ARFoundation version 4.1.3, ARCore XR Plugin version 4.1.3.
- Click on File → Build Settings → Player Settings → XR Plug-in Management and check the box for ARCore.

In the hierarchy:
- Select the Main Camera and delete it.
- Right-click on the Hierarchy and select XR → AR Session Origin.
- Select the AR Camera from the hierarchy and change the tag to Main Camera.
- Right-click on the hierarchy again and select XR → AR Session.

⚠️ Skip the next step if you are using Unity version 2020.
Editing Gradle files:
- Open the Gradle files mainTemplate.gradle and launcherTemplate.gradle which can be found in your project folder: Assets/Plugins/Android/
- Delete the following lines from both files: // GENERATED BY UNITY. REMOVE THIS COMMENT TO PREVENT OVERWRITING WHEN EXPORTING AGAIN
- Add the following code at the top to both files:
That's it! Now the project is ready for development and the APK can be easily built and uploaded on Play Store.
Testing
- In the hierarchy, right-click, 3D Object → Cube.
- Reduce the scale of the cube to (0.5, 0.5, 0.5).
- Drag it in z-direction till it is seen in the Game View.
- Click on File → Build Settings → Add Open Scene → Build and Run. (Make sure your phone is connected and Debug mode is enabled and allowed on your phone).
- Give a name to your APK and save it.
- Wait for the build to be completed and the app to launch on your phone.
After launching, if you are able to see the cube and it is tracked when you move the phone, this would mean that all the settings are perfect and you should not have any problem.
Personal suggestion
Once you have the project tested and ready, save and exit it. Navigate to the location of this project and rename it as a Template. Create a GitHub repository and upload/push this project there.
💡 PRO TIP: While pushing Unity projects to GitHub, you will need only the following folders: Assets, Packages, ProjectSettings, and UserSettings. The rest of them can be deleted, they are generated by Unity itself the next time you launch.
So, the next time you want to create a new AR Project, just make another copy/branch of the template and start working directly, you won't have to repeat this entire process of downloading all the packages, build- and project settings all over again!
Summary
- Download Unity and Android Studio along with the Development Kits i.e. SDK, NDK, JDK, and Gradle.
- Change the build settings in accordance with the Google Play Store guidelines. It is important to select scripting Backend to IL2CPP, changing API Compatibility Level to .NET 4.x and check the box for ARM64 under Target Architecture.
- Download the ARFoundation package and ARCore XR plugin.
- Create a testing scene with a 3D object, AR Session Origin, and AR Session.
- Test the project by building and running the APK.
Congratulations! You have successfully set up Unity to create amazing apps/games
