
Previously, we saw how to set up hand tracking, and we learned about grab interaction, poke interaction and ray interaction. If you haven’t checked out the first part of this series, we highly recommend checking it. In this blog, we’ll learn how to create our hand pose and use the pose detection component to detect it. Upon detection, we’ll perform some action.
Before we start:
Before we start:
- Make sure you have a Unity project with version 39 of the Oculus Integration package imported.
- A scene with the OculusInteractionRig setup for hand tracking.
Prerequisites
You need to have a good understanding of how the hand pose is detected. You can also check out Meta's Hand Pose Detection documentation.
To summarize:
To summarize:
There are different hand poses that we can do, like thumbs up, thumbs down, rock, paper scissors, etc. If you have tried out the sample scene that comes along with the SDK you might have seen it already. But, if you want to create your own you need to understand the basic concept of how the poses are detected. The hand pose detection happens in two steps one is shape recognition and the other is transform recognition.
The shape recognizer component considers the state of the finger joints and the transform recognizer component considers the hand’s orientation in 3D space. Each finger is configured by listing the desired state of one or more Finger Features: Curl, Flexion, Abduction, and Opposition. To learn more you can check Meta's Shape Recognition documentation.
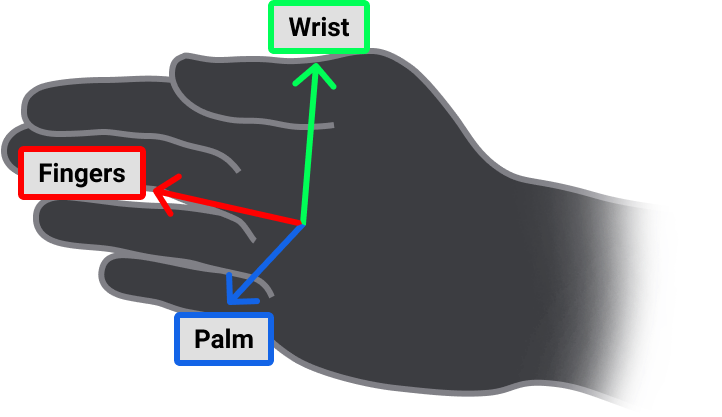
The transform recognizer component checks the position and orientation of the hands. For example, if the palm is facing up, down, facing the face or facing away from the face. It recognizes other parts of the hand too, for example, the wrist and finger. To learn more you can check Meta's documentation on Transform Recognition.
Creating a Custom Pose
There are various hand poses we can create and for this blog I am choosing the Spiderman hand pose. Creating a pose is simple, it’s a scriptable object that comes along with the Oculus SDK, all we need to do is configure it to match the pose we require. So to create a pose:
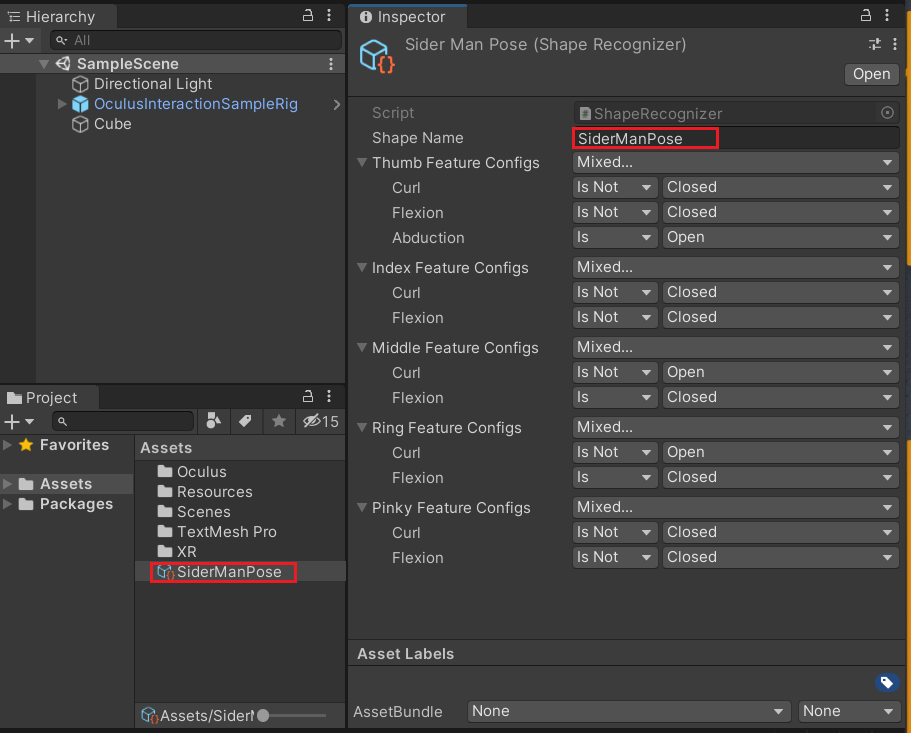
- Right-click on the Project window and click on Create→ Oculus → Interaction →SDK → Pose Detection → Shape. You can name the shape as SpiderManPose.

- Let’s now configure each of the fingers to match the SpiderManPose
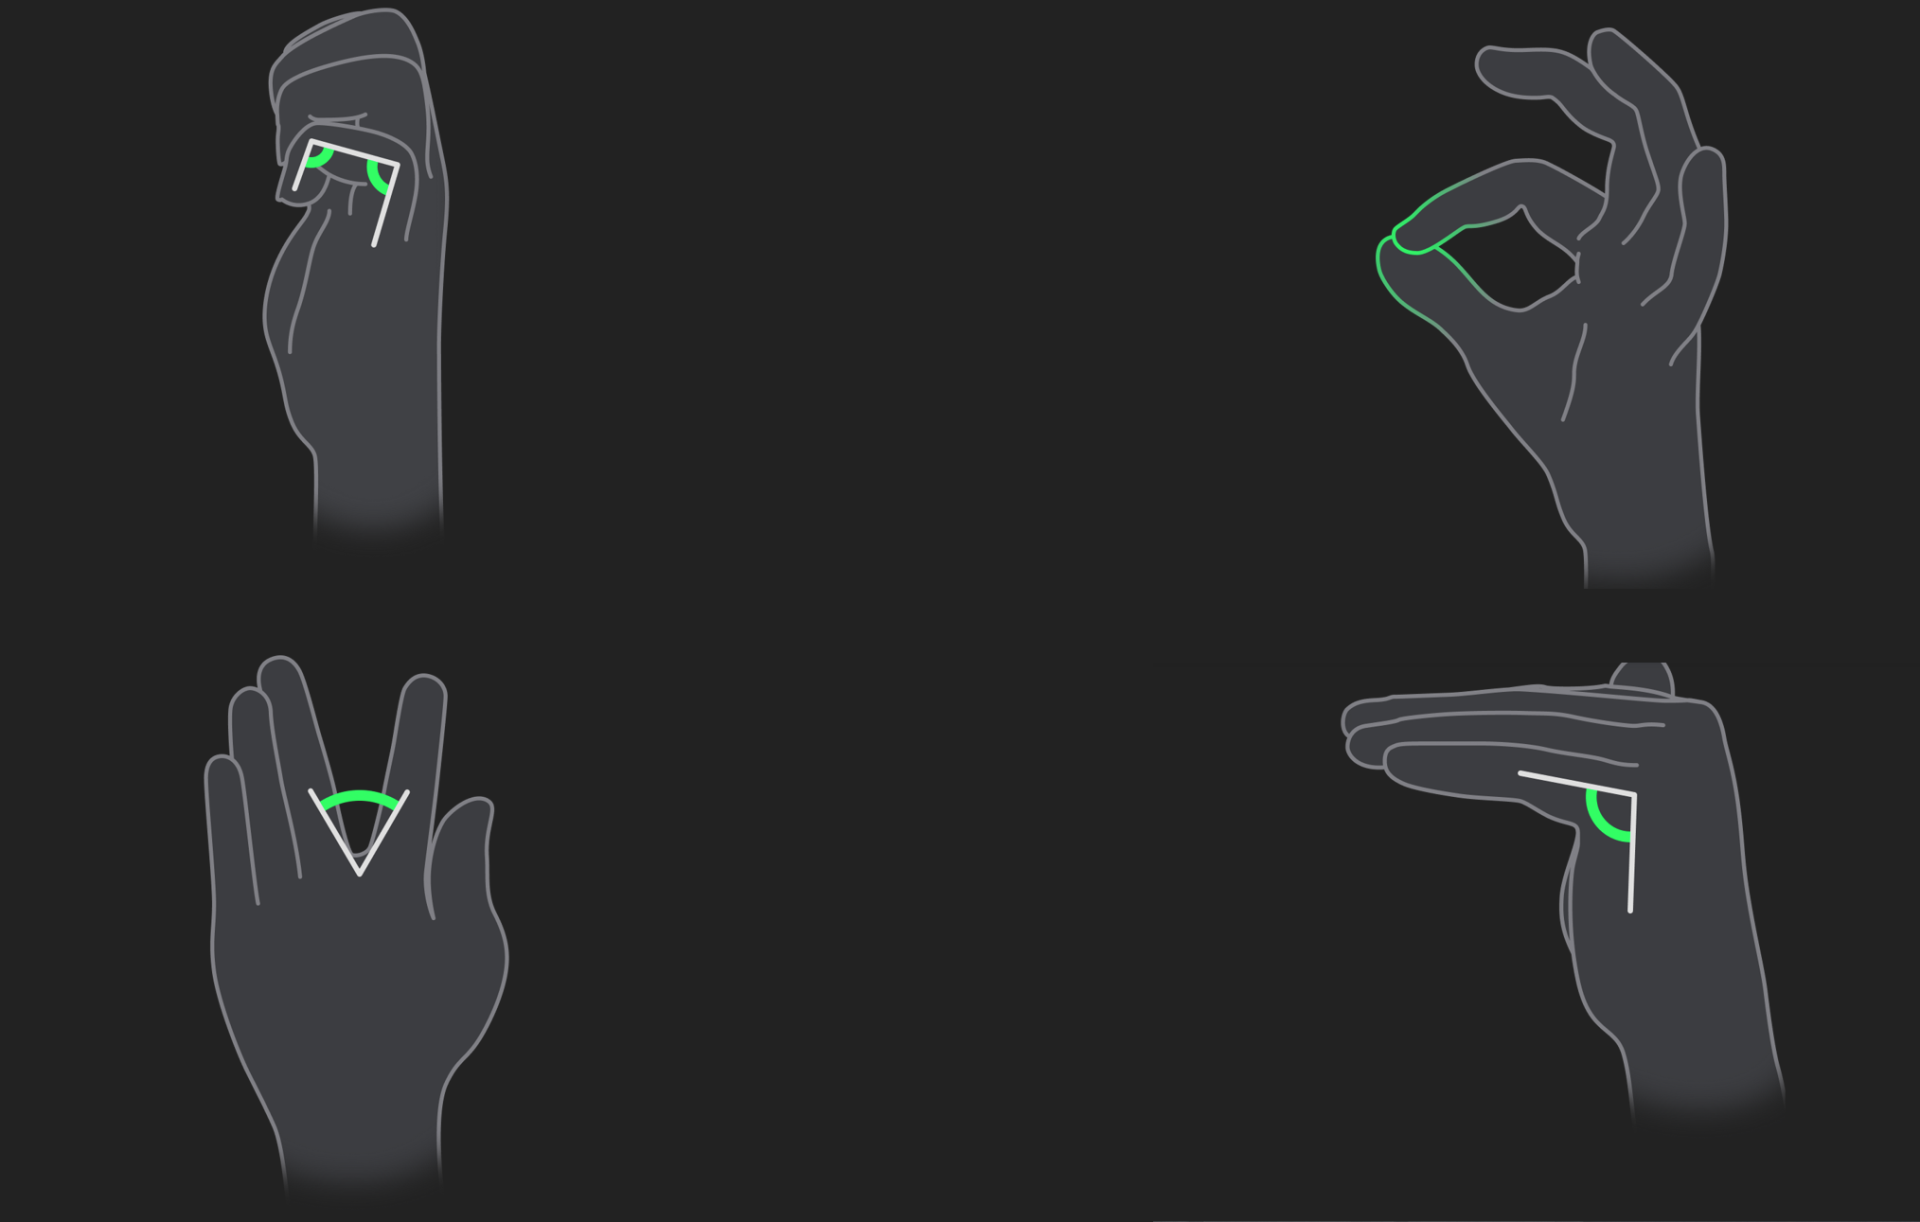
- The thumb can be fully opened or slightly bent but not fully closed, it should not be fully bent around the knuckle and there has to be a gap between the thumb and the index finger.
- Thus, the thumb feature needs three types of configuration. Those are curl, flexion and abduction. Where the Curl Is Not Closed, Flexion Is Not Closed and Abduction Is Open
- The index finger can be fully opened or slightly bent but not fully closed, it should not be fully bent around the knuckle and the gap between the index finger and the middle finger doesn’t matter.
- So, the index feature needs two types of configuration and those are curl and flexion. Where the Curl Is Not Closed and Flexion Is Not Closed.
- The middle finger can be fully closed or slightly bent but not fully open, it should be fully bent around the knuckle and the gap between the middle finger and the ring finger doesn’t matter.
- So, the middle feature needs two types of configuration, curl and flexion. Where the Curl Is Not Open and Flexion Is Closed.

- The ring finger is the same as the middle finger. So the ring feature will also need two types of configuration, curl and flexion. Where the Curl Is Not Open and Flexion Is Closed.
- The pinky finger is the same as the index finger. So, the pinky feature will also need two types of configuration and those are curl and flexion. Where the Curl Is Not Closed and Flexion Is Not Closed.
- We’ll also provide a name for the shape which is the same as the scriptable object SpiderManPose.
With that we have created a pose that can be detected, next we’ll add the components that are required for pose detection.
Pose Detection
For the pose detection to work correctly, we’ll have to make sure the right components are added and the correct parameters are referenced. So, ensure that you’ll follow the exact steps given below to add pose detection to the scene.
- Create an empty GameObject by right-clicking on the Hierarchy window and selecting Create Empty. Name it as PoseDetection.
- Let’s create the pose detection for the left hand. So, create an empty GameObject as a child of PoseDetection GameObejct by right-clicking on it and selecting Create Empty. Name it as SpideyPoseLeft.
- Select the SpideyPoseLeft GameObejct and add the following components:
- Hand Ref: This component will take either the left hand or the right hand as a reference.
- Shape Recognizer Active State: This component will take a reference hand and a Shape (custom pose) as input. When the pose is detected on the referenced hand it will output true or else false.
- Transform Recognizer Active State: This component will take a reference hand as input and check if the hand’s transform matches the set parameters. If the hand transform is within a predefined threshold then the output will be true or else false.
- Active State Group: This component will be used to check the output of both the Shape Recognizer Active State and Transform Recognizer Active State components. It acts as a logic gate.
- Active State Selector: This component will take the referenced active state as input and trigger events when it’s true or false.
- Selector Unity Event Wrapper: This component will take the selector as input and allow us to perform some action when the events are triggered.
- Now let’s add the parameters to each of the components
- Open the OculusInteractionSampleRig prefab to view its children → open the InputOVR to view its children → open the Hands GameObejct to view its children.
- Drag and drop the LeftHand GameObject into the Hand parameter of the Hand Ref component.
- Drag and drop the Hand Ref component into the Hand parameter on the Shape Recognizer Active State component. Also, drag and drop the custom pose we had created earlier into the Shapes list parameter.
- Drag and drop the Hand Ref component into the Hand parameter on the Transform Recognizer Active State component → select Palm Up as the parameter for Transform Feature Configs, also make sure the Palm Up parameter is True→ for the parameter Feature Thresholds select theDefaultTransformFeatureStateThresholds.
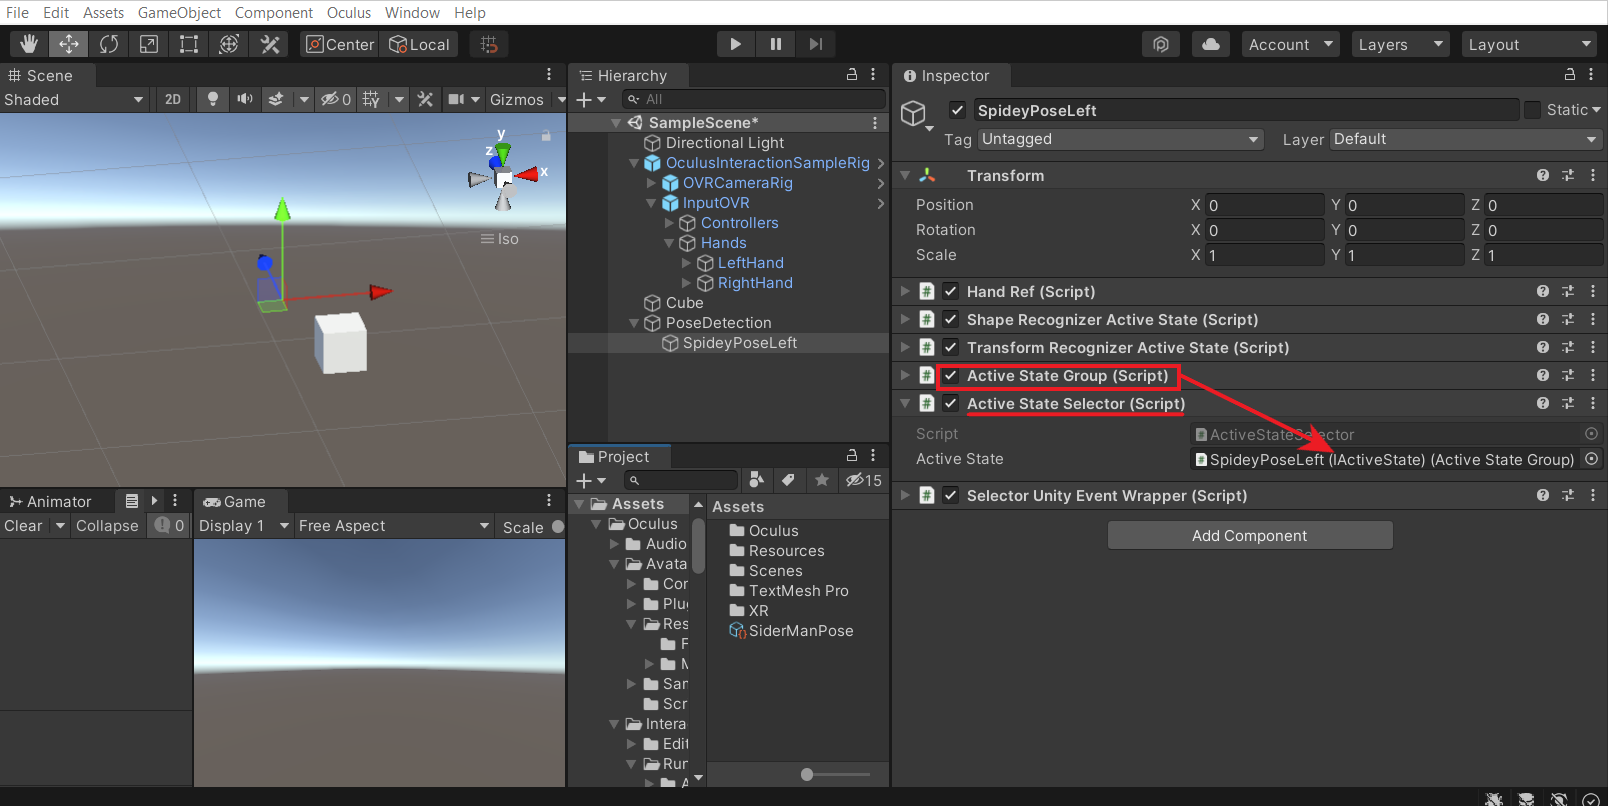
- Drag and drop the Shape Recognizer Active State component and the Transform Recognizer Active State component into the Active States parameter of the Active State Group component. Make sure the Logic Operator parameter is AND.
- Drag and drop the Active State Group component into the Active State parameter on the Active State Selectorcomponent.
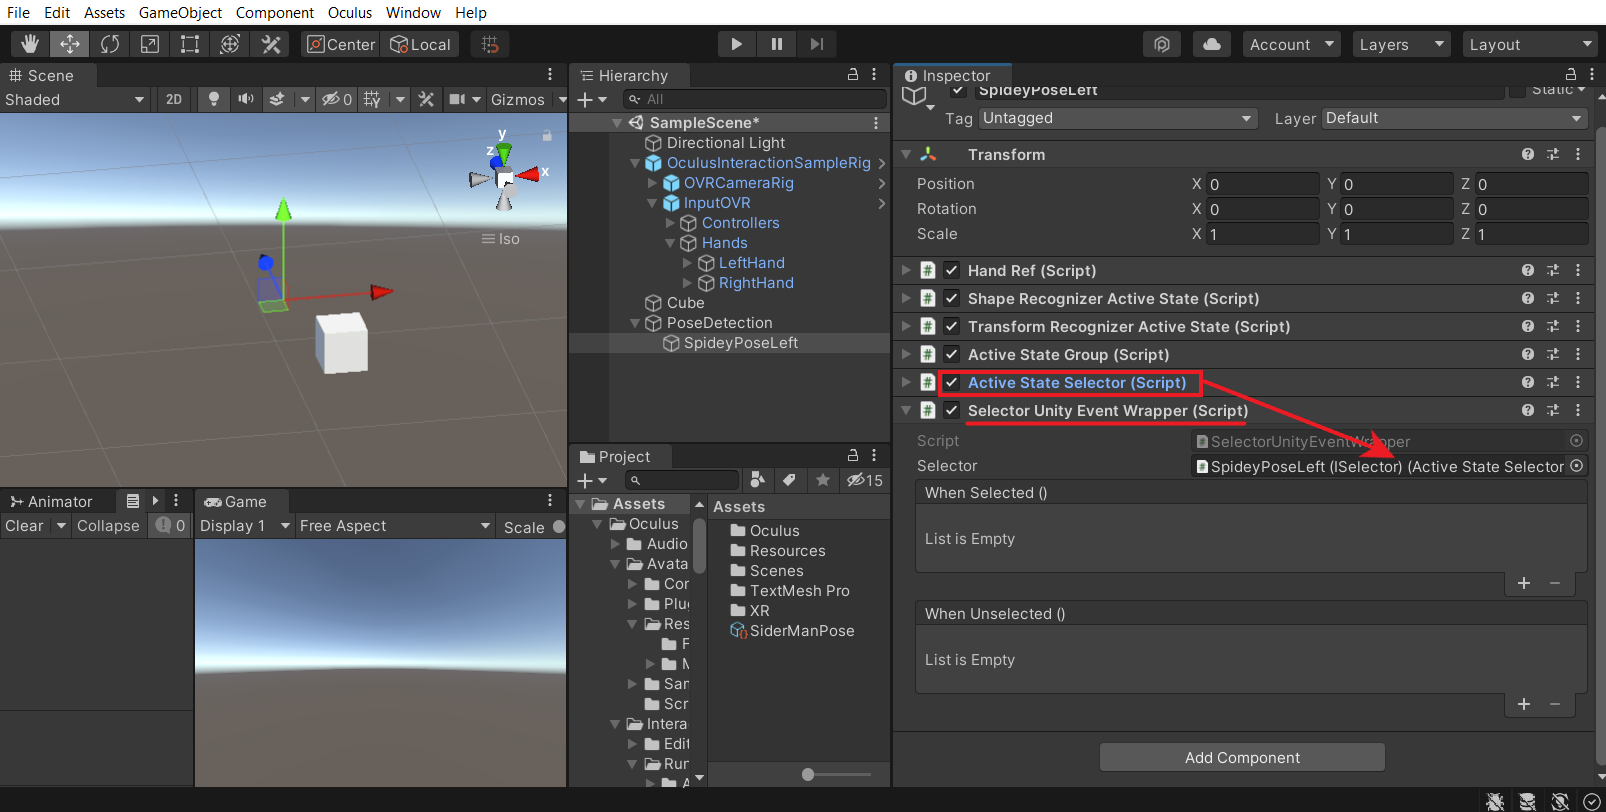
- Drag and drop the Active State Selector component into the Selector parameter on the Selector Unity Event Wrappercomponent.
- If you want to create the same pose detection for righthand as well, all you need to do is:
- Duplicate the SpideyPoseLeft GameObejct.
- Rename it as SpideyPoseRight.
- Drag and drop the Right Hand GameObejct into the Hand Ref component
Before we use the events to carry out some tasks, let's add debug visualizers to see if the pose detection is happening correctly.
Debugging Hand Pose
The SDK comes with a few debug visualizer prefabs which we can make use of to visualize the hand pose. The visual cue will give us a better understanding of how the hand pose is getting recognized. This will allow us to quickly identify the problem and debug it.
- Create an empty GameObject by right-clicking on the Hierarchy window and selecting Create Empty. Name it as PoseDebug.
- Debugging shape recognizer:
- In the Project window search for HandShapeSkeletalDebugVisual → drag and drop the prefab inside the PoseDebug GameObejct.
- Drag and drop SpideyPoseLeft GameObject into the Shape Recognizer Active State parameter of the Hand Shape Skeletal Debug Visual component.
- This prefab will use a line rendered to show the skeletal view of the hand. A green line renderer indicates that the bone of the finger is detected in the correct configuration as defined. Whereas a red line renderer would indicate otherwise.
- You can now hit play and see the debug visualizer at work. You will be able to see that the entire hand skeleton turns green only when the correct hand pose is detected.
Debugging transform recognizer:
- In the Project window search for TransformRecognizerDebugVisual → drag and drop the prefab inside the PoseDebug GameObejct.
- Drag and drop the LeftHand GameObject into the Hand parameter of the Hand Shape Skeletal Debug Visual component. Also, drag and drop SpideyPoseLeft GameObject into the Transform Recognizer Active State parameter.
- Move the prefab such that it’s slightly ahead of the camera.
- This prefab uses a cube to show whether the hand orientation is right or wrong. A green cube would indicate the hand is facing the direction as defined and a red cube would indicate that the hand is not facing the direction defined.
- When you hit play, you’ll be able to observe that the cube turns green when the plan is facing up and red otherwise.
Now that we have verified that the hand pose works correctly, disable the PoseDebug GameObject and move on to the next section.
Assigning Task
We can make use of the Unity events from the Selector Unity Event Wrapper component to carry out some tasks. For now, we can disable the Cube GameObject when the pose is detected and enable it when the pose is not detected. So, to do that:
- Select the SpideyPoseLeft GameObejct → under the Selector Unity Event Wrapper component and click on the plus sign ➕ at both the event calls.
- Drag and drop the Cube GameObejct into that Object parameter.
- Under the When Selected() parameter select GameObject → SetActive (bool) → make sure the box is unchecked.
- Similarly, under the When Unselected() parameter select GameObject → SetActive (bool) → make sure to check the box ✅
With that, we have finished setting up or scene with pose detection and the task that has to be carried out when the pose is detected.
Testing
Remember that we have added the task to disable and enable GameObject only for the left hand on pose detection. So when the pose is detected on the left hand the cube should disappear and when the pose is no longer detected it should reappear. You can hit the play button and test it out.
Conclusion
In this blog post, we saw how to create our pose and use the events to perform some tasks. There are various ways you can use pose detection, it can be used to open menus, locomote, a simple game, learn sign languages and many more. Make sure to create your pose and create some amazing experiences.
